
5 മിനുട്ട് മാത്രം മതി.! ഇനി പ്ലമ്പറും വേണ്ടാ പൈസയും വേണ്ടാ; വീട്ടിലെ ടാപ് നമുക്ക് തന്നെ റെഡി ആക്കാം.. | Tap leakage repairing Tip
Tap leakage repairing Tip
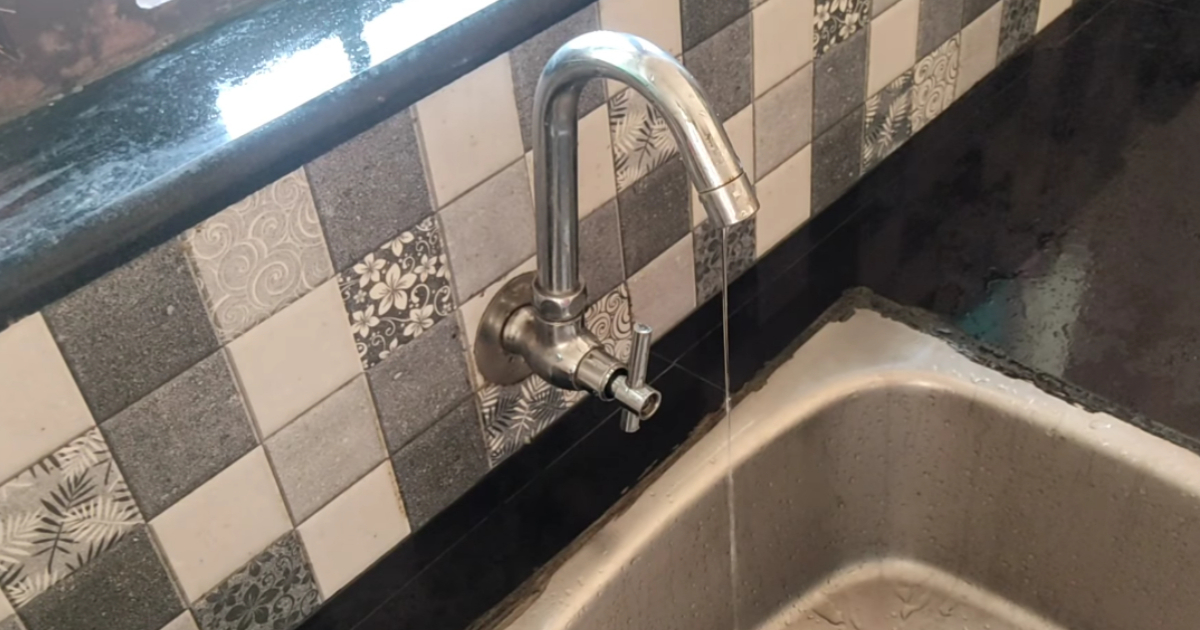
Tap leakage repairing Tip : അടുക്കളയിലെ സിങ്കിനോട് ചേർന്ന് ഫിറ്റ് ചെയ്ത് കൊടുക്കുന്ന ടാപ്പുകൾ വളരെ കുറഞ്ഞ കാലയളവിനുള്ളിൽ തന്നെ കേടു വരുന്നത് മിക്ക വീടുകളിലെയും ഒരു പ്രശ്നമാണ്. ധാരാളം വെള്ളം കെട്ടിനിൽക്കുന്ന ഏരിയ ആയതുകൊണ്ട് തന്നെ പൈപ്പുകൾ എളുപ്പത്തിൽ തുരുപ്പിടിച്ച് കേടുവരുന്നതാണ് മിക്കപ്പോഴും സംഭവിക്കുന്ന കാര്യം.
ഇത്തരത്തിൽ ടാപ്പുകൾ കേടു വന്നാൽ ഒന്നുകിൽ പ്ലംബറെ വിളിച്ച് ശരിയാക്കേണ്ടി വരും, അതല്ലെങ്കിൽ ടാപ്പ് പൂർണമായും മാറ്റേണ്ടതായും വരും. എന്നാൽ ഇത്തരത്തിൽ കേടാകുന്ന ടാപ്പുകൾ വളരെ എളുപ്പത്തിൽ എങ്ങനെ സ്വന്തമായി ശരിയാക്കി എടുക്കാൻ സാധിക്കുമെന്ന് വിശദമായി മനസ്സിലാക്കാം. ആദ്യം തന്നെ വെള്ളം വരുന്ന മെയിൻ പൈപ്പ് ഓഫാക്കിയതിനു ശേഷം വേണം ഇത്തരം കാര്യങ്ങൾ എല്ലാം ചെയ്യാൻ. ശേഷം പ്ലെയർ എടുത്ത് ടാപ്പിന്റെ പുറത്തു കാണുന്ന
ആദ്യത്തെ കവർ പതുക്കെ അടർത്തി മാറ്റുക. ഇപ്പോൾ അതിന്റെ ഉൾവശത്തായി ഒരു സ്ക്രൂ ഫിക്സ് ചെയ്ത രീതിയിൽ മറ്റൊരു കവർ കൂടി കാണാനായി സാധിക്കും. പ്ലേയർ ഉപയോഗപ്പെടുത്തി പതുക്കെ തിരിച്ചു കൊടുക്കുമ്പോൾ തന്നെ നടുവിലായി ഫിറ്റ് ചെയ്തിട്ടുള്ള സ്ക്രൂ അഴിഞ്ഞു വരുന്നതാണ്. ശേഷം ടാപ്പിന്റെ മുഴുവൻ ഭാഗവും എളുപ്പത്തിൽ അഴിച്ചെടുക്കാം. ഇത്തരത്തിൽ അഴിച്ചെടുക്കുന്ന ടാപ്പിന്റെ സൈഡിലായി ഒരു ലോക്ക് നൽകിയിട്ടുണ്ടാകും അതുകൂടി പൂർണ്ണമായും
അഴിച്ചു മാറ്റണം. ശേഷം അഴിച്ചു വെച്ച ടാപ്പിന്റെ ഓരോ ഭാഗങ്ങളായി നല്ല രീതിയിൽ വൃത്തിയാക്കി എടുക്കുക. തുരുമ്പ് പിടിച്ച ഭാഗങ്ങളിലെ തുരുമ്പ് ചുരണ്ടി കളയുകയും, ചളി പിടിച്ച ഭാഗങ്ങൾ വെള്ളത്തിലിട്ട് കഴുകിയെടുക്കുകയും വേണം. ഇത്തരത്തിൽ ടാപ്പിന്റെ എല്ലാ ഭാഗങ്ങളും വൃത്തിയാക്കിയ ശേഷം പഴയ രീതിയിൽ തന്നെ ഫിക്സ് ചെയ്തു കൊടുക്കാവുന്നതാണ്. ടാപ്പിൽ ഉണ്ടാകുന്ന ചെറിയ രീതിയിലുള്ള ലീക്കേജ് പ്രശ്നങ്ങളും, ബ്ലോക്കുകളുമെല്ലാം എല്ലാം ഈ രീതിയിൽ എളുപ്പത്തിൽ ശരിയാക്കി എടുക്കാവുന്നതാണ്. വിശദമായി മനസ്സിലാക്കാൻ വീഡിയോ കാണാവുന്നതാണ്. Tap leakage repairing Tip
🛠️ Tools & Materials Needed:
- Adjustable wrench / spanner
- Screwdriver
- New washer or O-ring (depending on the tap type)
- Plumber’s tape (Teflon tape)
- Cloth or towel to wipe water
🔧 Steps to Repair a Leaking Tap:
- Turn Off the Water Supply
- Before starting, close the main water supply or the valve connected to the leaking tap.
- Open the tap fully to drain any remaining water.
- Disassemble the Tap
- Use a screwdriver to remove the tap handle.
- Unscrew the cover or bonnet nut with a wrench carefully.
- Check the Washer / O-ring
- Most leaks happen because the washer (in compression taps) or O-ring (in mixer taps) is worn out.
- Inspect them for cracks, flattening, or damage.
- Replace the Faulty Part
- Buy a new washer or O-ring of the same size from a hardware shop.
- Replace the old one with the new piece.
- Wrap a little plumber’s tape around the threads for extra sealing.
- Reassemble the Tap
- Put all parts back in order.
- Tighten the nut and handle but do not over-tighten as it may damage the fittings.
- Turn On Water Supply & Test
- Open the main valve again.
- Check if the leak has stopped. If the tap still drips, the seat of the tap (the part where washer rests) might be worn, and you may need a plumber to regrind or replace it.
✅ Tip: Regularly check washers and O-rings every few years to prevent sudden leaks.
💡 Even a small drip can waste litres of water daily, so fixing it quickly saves water and money.